Speed up your website with Cloudflare
Cloudflare helps boost your website’s speed by caching content, reducing latency, and optimizing performance through its global content delivery network (CDN). It also adds an extra layer of security, protects against DDoS attacks, and ensures your site loads faster for visitors worldwide. Whether you run a blog, e-commerce site, or business platform, Cloudflare makes your website faster, safer, and more reliable.
What is Cloudflare Web Hosting?
In today’s world, website speed and security are more important than ever. A slow-loading website not only frustrates visitors but also negatively impacts your SEO rankings and overall user experience. That’s where Cloudflare comes in. As one of the most trusted and widely used performance and security solutions, Cloudflare helps boost your website’s speed, protect it from threats, and ensure it runs smoothly at all times.
Cloudflare improves your website performance by caching static content closer to your users through its powerful global Content Delivery Network (CDN). This greatly reduces latency, improves load times, and ensures your content reaches users faster, no matter where they are in the world. Whether you’re running a personal blog, an e-commerce store, or a corporate website, Cloudflare helps deliver a lightning-fast experience that keeps your visitors engaged.
Benefits of Cloudflare Web Hosting
How to Set Up Cloudflare to Your Hosting: Step by Step
Setting up Cloudflare with your hosting account doesn’t have to be complicated — especially with HostAnytime. Follow these simple steps to connect your domain to Cloudflare and enjoy faster speeds and stronger security.
Step 1: Create a Cloudflare Account
If you don’t have a Cloudflare account yet:
Visit Cloudflare.com and sign up for a free account.
Enter your email address and create a secure password.
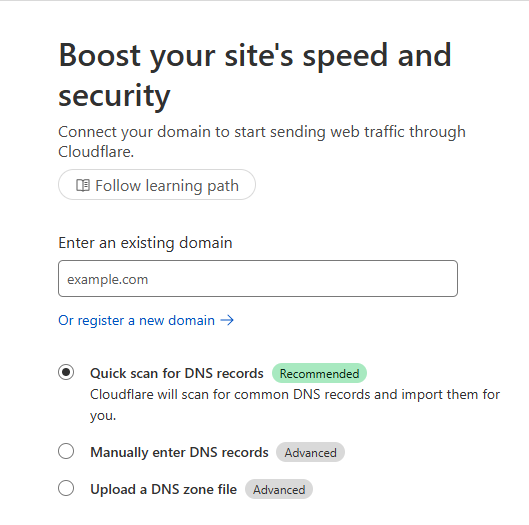
Step 2: Add Your Website to Cloudflare
After logging in, click “Add a Site.”
Enter your domain name (e.g.,
yourwebsite.com) and click “Add Site.”Choose a Cloudflare plan — the Free Plan is perfect for most sites.
Step 3: Cloudflare Scans Your DNS Records
Cloudflare will automatically fetch your existing DNS records.
Double-check everything (A records, MX records, etc.) to ensure accuracy.
If you’re a HostAnytime user, your A record should point to your HostAnytime server IP.
Step 4: Update Your Nameservers
Cloudflare will provide you with two nameservers.
Go to your domain registrar (e.g., Namecheap, GoDaddy).
Replace the current nameservers with the Cloudflare nameservers.
This change may take up to 24 hours to propagate globally.
Step 5: Enable SSL and Optimize Settings
In your Cloudflare dashboard:
Go to the SSL/TLS section and choose “Full” or “Full (Strict)” for secure HTTPS.
In Speed settings, enable Auto Minify (HTML, CSS, JS) and Brotli compression.
Enable Caching and set your cache level to “Standard.”
Turn on Rocket Loader for faster JavaScript rendering.
Step 6: Test Everything
After DNS changes propagate, your site will be live on Cloudflare’s network.
Visit your website to ensure it’s loading correctly with HTTPS and caching enabled.
Use tools like GTmetrix or Pingdom to test speed improvements.
That’s It!
With Cloudflare active, your site is protected, faster, and optimized for global traffic — all while running smoothly on HostAnytime’s high-performance servers.